Creating a fanamation
By aDarkTut

this is my own tutorial please do not share in part or in whole except by link here
open new Image 600X600
pick an Item any will do I used a disk shape
jeep it open off to the side you will need it again
Copy and paste into image
effect reflection effects feedback apply

*setting may very for your piece*
edit copy, delete this layer, and paste as new layer
image is now centered
Image resize 80%, repeat
Effects Plugins Mura's Meister Copy

Your settings may vary

edit copy and delete this layer, past as new layer
image is now centered
Duplicate x3 so you have 4 layers of this image
layer one Image rotate 0
Layer 2 rotate 45
layer 3 rotate 90
layer 4 rotate 180,
Duplicate layer 4 and rotate 45


copy original image and paste as top layer
close bottom layers 1, 2, 3, 4
edit copy merged
open Animation shop2 paste as new image

go back to psp close layer 5 open 4 edit copy merged
go back to ani3 click on image paste after
continue until all layers are in Ani3
this is now a fanamation lol you can use it in nay tag you create
I would save it as a .mng for later use as you can always change the colours


Following are the steps I took to make this tag
it is my own tag and I followed no one's direction
any resemblance to someone else's is by purest chance
Supplies needed
PSP
PSP
open a 488 x 356, 72 dpi, transparent background
new layer
open a tube of your choice
I am using the Fantastic Art of
Charles Bristow
He is a PTU Artist
Please do not use with out a License
Dropper tool choose 2 colours from your tube
for your materials
1 foreground and 1 background
Copy your tube and close it
Ctrl+L 3 times to your new image close the top 2 copies
on the original layer apply PSP Filter adjust - blur - Gaussian 67
Ctrl+L 3 times to your new image close the top 2 copies
on the original layer apply PSP Filter adjust - blur - Gaussian 67
Effect - MuRa's Meister filter - Copies - wallpaper rotate
play with these settings until you like the preview
open your top image and position it toward the top and off to one side of your tag
open next layer and Image, mirror, reduce opacity to 50
play with these settings until you like the preview
open your top image and position it toward the top and off to one side of your tag
open next layer and Image, mirror, reduce opacity to 50
select raster 1 select all keep selected
return to wallpaper layer
select modify contract 20
using your move tool move top image to inside selection
move 2nd layer to outer edge
Selection, invert
Adjust, brightness, Brightness settings -35, contrast +15
do this on wallpaper and middle image layer only
do not deselect
Effect, Texture, blinds = size 6 opacity 50 Vertical select one of your colours
apply to both the wall paper and middle layer
Effect, Texture, blinds = size 6 opacity 50 Horizontal use same colour as previously
apply to both the wall paper and middle layer
highlight top tube layer do not deselect
create a new layer (Frame)
Selection, invert, fill with the second colour you did not use for the blinds effect
selection modify contract 5 delete deselect
apply copyright and your license # to top layer
save one copy as a psp image to reuse Again and again
I like to us _ArtistsInitials_TagName_aDarkTag
add sayings or names save as jpg share! you're done
or are you?
to animate this tag
to animate this tag
you will need
AS3
MuRa's Meister Copies
Eye Candy 4000
MuRa's Meister Copies
Eye Candy 4000
open AS3
go back to your frame layer
using the selection wand click inside the frame
selection, invert
close the frame layer
copyright layer
and name layer
using the selection wand click inside the frame
selection, invert
close the frame layer
copyright layer
and name layer
Effect, copy merged,
paste as new layer (Ctrl+L) X 3 lable anim
layer 1
Effect, eyecandy 4000, HSB
25, 40, 40, 0, 50, 20, 50, seamless un ticked, 2396
repeat for each anim layer but change the random seed
Make all visible
close the top two anim layers and the name layer
Edit, copy merged
go to Animation shop 3 (AS3)
Paste as new animation
go back to psp
close current anim layer open layer 2
Edit, copy merged
AS3 Paste after
and repeat for final frame
save animation as a .gif
you are now ready to add names

Here are some AWESOME tags
from people that tried this tut
Thank you Maria

Thank you Ceci
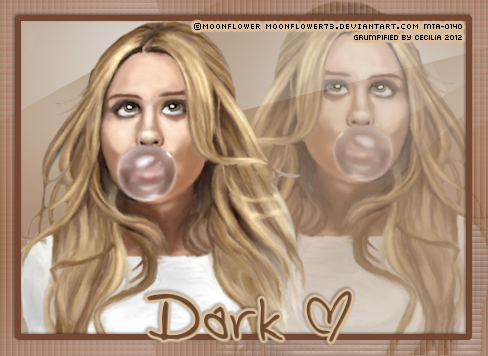
Thank you Edith

No comments:
Post a Comment